WhatsApp Business API Setup: Technical Integration Guide
Important Note: This is a technical setup guide intended for developers or technically-minded business owners. If you're not comfortable with API configurations, consider working with a developer or contacting our support team for assistance.
This guide walks you through the complete technical process of connecting your WhatsApp Business API to Nviti.ng. While the steps are detailed, they require careful attention to avoid errors.
Before You Begin (Technical Requirements)
You'll need these items ready before starting:
- WhatsApp Business Account: Verified and approved by WhatsApp
- Facebook Business Manager: Active account with admin permissions
- Facebook Developer App: Configured with WhatsApp Business API permissions
- Technical Skills: Comfort with APIs, tokens, and command-line tools
- Time: Allow 30-45 minutes for the complete setup process
Part 1: Obtain Credentials from Facebook
Step 1: Generate a Permanent Access Token
First, you need a permanent Access Token to authorize API requests.
- Navigate to Facebook for Developers: Go to developers.facebook.com and select your app.
- Get a Temporary Token: Go to WhatsApp → Getting Started. In the Access Token section, you will find a temporary token. This token is valid for 24 hours and is used in the next step to create a permanent one.
- Generate a Permanent Token:
- Go to the Graph API Explorer at developers.facebook.com/tools/explorer.
- Select your app from the dropdown menu.
- Click "Generate Access Token" and then "Get User Access Token".
- Select the following permissions:
whatsapp_business_managementwhatsapp_business_messagingbusiness_management
- Click "Generate Access Token".
- Exchange this short-lived token for a long-lived one by running the following
curlcommand in your terminal.
curl -i -X GET "https://graph.facebook.com/v19.0/oauth/access_token?grant_type=fb_exchange_token&client_id=YOUR_APP_ID&client_secret=YOUR_APP_SECRET&fb_exchange_token=YOUR_SHORT_LIVED_TOKEN"
Replace the following:
YOUR_APP_ID: Your Facebook App ID (found in App Settings → Basic).YOUR_APP_SECRET: Your App Secret (found in App Settings → Basic).YOUR_SHORT_LIVED_TOKEN: The temporary token from the previous step.
The response will contain your permanent access token. Save this token in a secure location.
Step 2: Get Your App and Account IDs
You will need three different IDs from the Facebook Developer dashboard.
- Find Your Phone Number ID:
- In your Facebook app, go to WhatsApp → Getting Started.
- Locate the "Phone number ID" and copy it.
- Find Your WhatsApp Business Account ID:
- On the same page, locate the "WhatsApp Business Account ID" and copy it.
- Find Your App ID:
- Navigate to App Settings → Basic to find your "App ID".
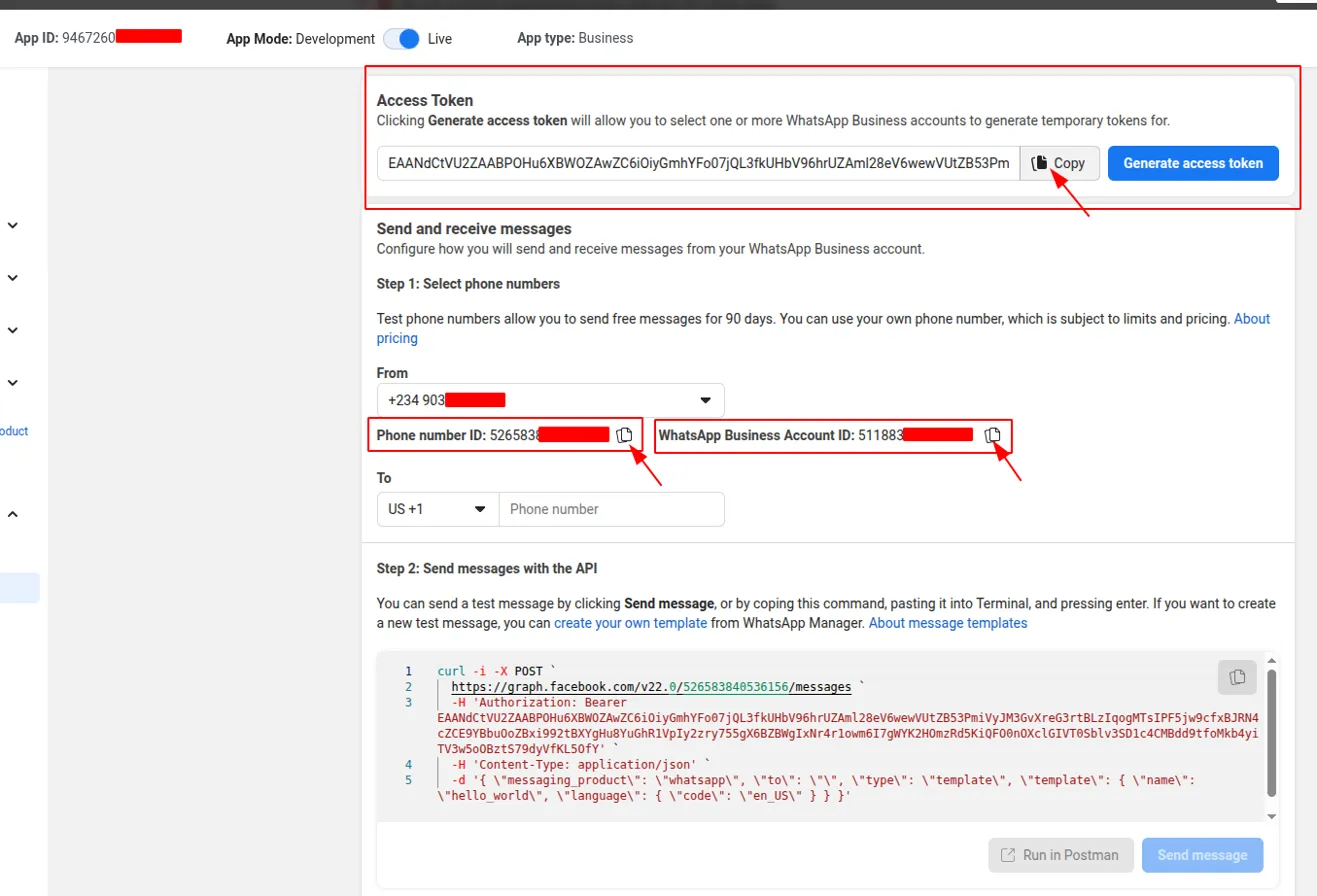
Visual Guide for Access Token and IDs:
Below is a screenshot from the Facebook Developer console's "Getting Started" section for WhatsApp. It highlights where to find your temporary Access Token, Phone Number ID, and WhatsApp Business Account ID.

- Access Token (Top Red Box): This is where you'll find the temporary access token. Remember to generate a permanent one as described in Step 1.
- Phone Number ID (Middle Red Box): This unique identifier for your WhatsApp phone number is crucial for sending messages.
- WhatsApp Business Account ID (Bottom Red Box): This identifies your overall WhatsApp Business Account.
Part 2: Configure Your Nviti.ng Account
Step 3: Input Your Credentials
Now, you will add the credentials you just collected into your Nviti.ng workspace.
- Navigate to WhatsApp Business Settings: In your Nviti.ng dashboard, go to the WhatsApp Business configuration page.
- Create or Edit a Configuration: Click to create a new WhatsApp Business account or edit an existing one.
- Enter Your Credentials: In the configuration form, paste the following information you collected in the previous steps:
App IDPhone Number IDWhatsApp Business Account IDPermanent Access TokenBusiness Phone Number
- Save the Configuration. After saving, Nviti.ng will generate a unique Webhook URL and Verify Token for you. You will need these for the next step.
Part 3: Configure Webhooks in Facebook
Step 4: Set Up Your Webhook
This final step connects your WhatsApp account to Nviti.ng so you can receive messages.
- Navigate to Webhook Configuration: In your Facebook App dashboard, go to WhatsApp → Configuration.
- Edit Webhooks: In the Webhooks section, click "Edit".
- Enter Webhook Details:
- Callback URL: Paste the Webhook URL generated by Nviti.ng.
- Verify Token: Paste the Verify Token generated by Nviti.ng.
- Verify and Save.
- Subscribe to Webhook Fields: After saving, click "Manage" in the Webhooks section and subscribe to the following fields:
- ☑️
messages - ☑️
message_deliveries - ☑️
message_reads - ☑️
message_reactions
- ☑️
- Save your subscriptions.
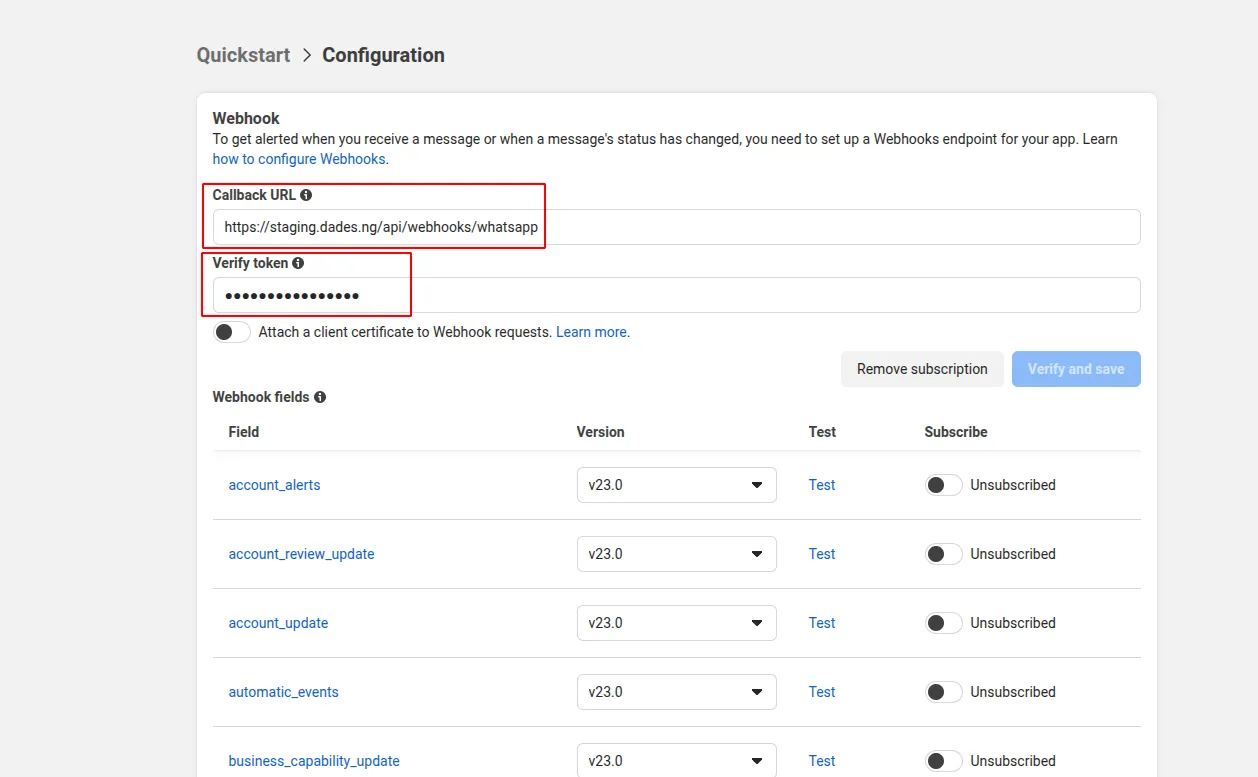
Visual Guide for Webhook Setup:
This image illustrates the webhook configuration section in the Facebook Developer console. It shows where to enter the Webhook URL and Verify Token, and how to subscribe to the necessary webhook fields.

- Webhook URL (Top Red Box): Enter the provided webhook URL here.
- Verify Token (Middle Red Box): Input the verify token provided by our application.
- Manage (Bottom Red Box): Click this to subscribe to the required webhook fields like
messages,message_deliveries, etc.
Part 4: Test and Go Live
Step 5: Test Your Configuration
- Send a Test Message from Facebook: In the WhatsApp → Getting Started section of your Facebook App, use the "Send and receive messages" tool to send a test message to a verified phone number.
- Verify Webhook: Send a message to your WhatsApp Business number from a personal WhatsApp account. The message should appear in your Nviti.ng Chat Zone.
Step 6: App Review (Production Use)
To send messages to any customer (not just test numbers), your app will need to be reviewed by Facebook. This requires:
- Business Verification: Complete business verification in your Facebook Business Manager.
- App Review: Submit your app for review with the
whatsapp_business_messagingandwhatsapp_business_managementpermissions. - Message Templates: Create and get approval for any message templates you plan to use for notifications.
Security Best Practices
- Never share your access token publicly. Treat it like a password.
- Only input the token into the secure Nviti.ng configuration page.
- The token grants full control over your WhatsApp Business account.
- You can revoke access at any time through your Facebook Business Manager.
Common Issues & Solutions
"Invalid Access Token"
- Regenerate the token following Step 1.
- Ensure you are using the long-lived (permanent) token, not the temporary one.
- Check that your app has the correct permissions assigned.
"Webhook Verification Failed"
- Ensure the Webhook URL from Nviti.ng is copied correctly and is publicly accessible via HTTPS.
- Verify the Verify Token matches exactly what is shown in your Nviti.ng dashboard.
"Phone Number Not Found"
- Ensure the phone number is properly added and verified in your WhatsApp Business Account.
- Double-check that the Phone Number ID is correct in your Nviti.ng settings.
"Rate Limited"
- Facebook's test numbers have a limit of 250 messages per day.
- For production use, you will need a fully approved business account.
Next Steps
Once your credentials are saved in Nviti.ng and the webhook is configured, your integration is active. You can now:
- Configure automation rules for your AI assistants.
- Set up message templates for marketing or notifications.
- Monitor and optimize your WhatsApp integration through the Chat Zone and Analytics.
Need Help? If you encounter any issues during setup, please contact the support team with:
- Screenshots of any error messages.
- Your App ID (this is safe to share).
- A description of the step where you are stuck.
Keywords
WhatsApp Business API, Facebook Developer, API setup, webhook configuration, access tokens, technical integration, WhatsApp Business Manager, API credentials, business verification, developer configuration